We walk through 8 ideas for Instagram monetization in this detailed article.
The Buffer blog is one of our most valuable assets for our Marketing team, bringing in hundreds of thousands of pageviews each month. The original Buffer Marketing team started posting to the blog as far back as 2013, a very different time for content on the Internet.
As you can probably guess, we don’t do things the same way anymore. Our blog and writing process have seen many iterations throughout the years.
For example, take a look at how our Content team worked together back in 2017 to plan our editorial calendar. While our team is still fully remote and distributed—Hailley Griffis, our head of Content and Communications, is based in the U.S., while writers Tami and Kirsti are in Africa (Nigeria and South Africa, respectively)—the process looks pretty different. We use different tools and processes, although our commitment to transparency and frequent communication is still essential.
If you’re looking for simple guidance on writing your first blog post, scroll down to the penultimate header, ‘How to write a blog post in 6 steps,’ for a simple guide.
Writing toolkit
This is not an exhaustive list as we might individually use different tools. But these are the tools we have in common across the Content Team:
- Notion: Content calendar and updates
- Ahrefs, SurferSEO, or Clearscope: Keyword research
- Google Docs or Dropbox Paper: Outlining and drafting
- Grammarly and Speechify: Editing
- Ghost: Publishing
- Buffer: Distribution
Types of blog posts we publish at Buffer
We share a mix of content from SEO to thought leadership on the Buffer blog. But while we, the content writers, write about 70 percent of the content on the blog, it’d be impossible to keep up with our pace without switching up our approach. So, we tend to have a variety of content from different voices. Here are some of the types of blog posts we write on the Buffer blog:
- Experimental or thought leadership articles
- How-to/tutorial articles
- Technical articles from engineers to the Open blog
- Product updates and announcements
- Culture-focused blog posts
- Guest posts
How Tami writes
I write various articles for the Buffer blog but want to focus on the type of content that’s our bread and butter – how-to/tutorial articles, which are typically optimized for search engines.
We usually fill our content calendar with these ideas and assign them to each other in our bi-weekly Editorial calls.
Callout: If you’re curious about our project management process, check out the article on how we collaborate on the Content team.
Here’s a behind-the-scenes look at my typical writing process from start to publish.
Keyword research with Ahrefs
Every great blog post starts with a great idea – and then follows that up with thorough keyword research.
A lot of my articles begin with a dive into Ahrefs, a powerful SEO tool we use on the Buffer team to identify primary and secondary keywords to target.
These keywords form the foundation of our approach to the article, as we consider elements like:
- Search intent to understand what our audience wants out of an article;
- Competition, to know who’s written about the same topic before and what our unique perspective would be;
- Search volume + keyword difficulty to see whether it’s a viable keyword to pursue.
Even if we aren’t aiming to have an article rank on the search engine results page (SERPs), this process ensures that we’re maximizing our options when it comes to distribution.
2. Content optimization with SurferSEO
Once I know the target keywords for the article, I move over to SurferSEO, a tool we use to optimize our content for our search overlords.
Surfer analyzes the top-performing pages for our chosen keywords and offers recommendations for structuring our content. It provides recommendations like the ideal word count, a list of keywords, and an overall content score to aim for.
3. Outline in Google Docs
Once I’m done in Surfer, I can migrate to Google Docs, our team’s writing tool of choice, to start outlining my article. Surfer has a handy Chrome extension that I use to build out the headers of my article.
These headings act as “containers” for the content, aligned with keywords, research, and the main point of each section. Next, I fill my outline with research – data, statistics, expert quotes, examples – and other valuable information to support my argument or advice.
Following this pattern in the outline stage can be time-consuming but helps me complete 30 percent of my article and figure out a cohesive flow before I dive into writing.
Turn outline to fleshed out draft
Once the outline is complete, it’s time to flesh it out into a full draft. I expand on each heading, adding context, examples and additional insights to the article.
With each draft, I keep the main goal for the article in mind, to identify anything that can be broken into smaller chunks and steps to be made easy-to-follow.
This is also the stage where I add internal links that match the search intent of the article. For example, if my article is a listicle of ideas for Instagram Reels, I would prioritize internal links that are also idea lists as well as other content related to the platform. This makes sure I’m improving the article’s ranking potential but also provides valuable additional resources to the reader.
I’ll also add visual elements like screenshots and videos, as well as embedded social posts. Sometimes, I put my amateur graphic design skills to use and have a go at Canva as well.
Visuals are key to making a blog post engaging, and wherever possible, I use them to illustrate my words. So, for an article on tips for creating engaging LinkedIn carousels, I’ll include examples that match each tip I’m giving.
6. Refine through self- and peer-edits
We run a peer-editing system where each member of the Content team reviews each other’s work. But before sending the article off to my colleagues for review, I run a perfunctory check through Grammarly, for which we have a team subscription.
After proofreading the draft, I’ll tag the team in our public Slack channel for review. This collaborative step provides additional perspectives and helps catch any errors I might have missed (which happens more often than you might think).
Our system is cleaner and aligns with our values of transparency, but it might not be practical on larger teams, so take what resonates and leave what doesn’t.
Once edits are made and implemented, I’ll revisit Surfer if the post is SEO-focused to check the content score and make necessary adjustments.
7. Add final touches and publish
With the draft polished, it’s time for final touches and publishing. First, I hunt down any remaining spots for internal and external links that could be valuable for the article.
Then I add in visuals since in the drafting stage, I usually leave a note for myself to add visuals later.
Finally, I add the post in Ghost, our CMS, and double-check that everything looks great, before scheduling for the post date.
8. Distribute
Writing a great blog post is only half the battle–you want to ensure it reaches the right audience. So once the post is live, the next step is distribution.
SEO is one piece of the puzzle, but there’s more to a solid distribution strategy. Sharing the blog post in multiple formats across multiple platforms is crucial for getting it to the widest possible audience.
We promote all our blog posts to social media using the zero-click content strategy. Whether in text-based threads, short videos, or carousel posts, we take the most important points from each article and adapt them to suit the platform, like this video from Kirsti about her TikTok experiment.
I also include the article in our weekly newsletter along with anything else published that week.. Depending on the week, I might turn it into a deep dive with immediately actionable takeaways for our readers.
Finally, I monitor the performance of the article, tracking our main metrics of focus – pageviews and signups – in a variety of content analytics tools and note down the performance of each article in a spreadsheet.
How Kirsti writes
My process for writing most blog posts is very similar to Tami’s, so I thought I’d walk you through how I handle what we call ‘experimentation’ or ‘I Tried It’ articles.
These are something we love to write on the Buffer Content, and, as a former journalist, they’re my personal favorite content pieces. They allow me to really roll up my sleeves and put myself in the shoes of Buffer readers and customers, and help establish a level of empathy and understanding that I’ll be able to leverage in future articles, too.
It certainly helps that these articles can’t be replicated by an AI writing tool, either!
Here are some examples of articles like this one:
- My TikTok Experiment: How I Grew My Following by More Than 1,000% in 30 Days
- I Got Meta Verified on Instagram — Here’s My Honest Review
- I Tried LinkedIn Premium as a Creator — Here’s My Honest Review
1. Testing, testing
In many of these articles, this is when I’ll put in the most work. I usually start by setting myself a time frame within which to conduct the experiment — usually two weeks or 30 days — and any other ‘rules’ required to limit the variables.
Depending on the experiment in question, there will be very different tasks to complete in this phase. As part of the TikTok experiment I mentioned above, I created a video or carousel every single day for 30 days.
On the Meta Verified and LinkedIn Premium reviews, I made sure I was signed up and grabbed some screenshots of my content performance before I activated the paid services (so I would have something to compare my results to).
Given that almost all of my experimentation articles involve helping our readers achieve goals like growth on a specific social media platform, I often find myself batch-creating content for whichever platform/s I’m testing.
Buffer is, of course, incredibly helpful thanks to the Create space — where all my social content ideas live — and the ability to schedule content in advance. In this phase, I’ll usually spend several hours creating as much content as I can (and repurposing old posts) to schedule over the course of my experiment.
2. Note-taking
This step happens largely in tandem with the testing period so it’s not strictly a step 2, but you get where I’m going with this. It really just involves jotting down observations about my experiment as the time period goes on. I usually use Notion or the Notes app on my phone for this.
Sometimes, these notes are just a bullet point list with a few words on each point, and sometimes, they are a stream-of-consciousness jumble of ideas I have for intros, guidance, and more.
As part of this process, I also make sure I grab screenshots of certain things as they happen so that I can include them in the article. I can usually get these after the fact, but having them upfront can be enormously helpful in shaping the narrative (especially when it comes to the first couple of hours of data on how a post has performed — often the most crucial time).
I try not to put too much pressure on myself to keep these notes organized (or coherent), because however they look, they are an enormous help when it comes down to actually sitting and writing the article.
3. Outline in Google Docs
As my experiment draws to a close, I usually have a good sense of where the results are headed and the kind of recommendations and learnings I want to share with our audience.
To that end, I’ll spend an hour or so pulling together an outline in Google Docs, ideally about a week before my deadline, if time permits. This gives me some breathing room to gather the rest of the information I know I’ll need.
I’ll occasionally add a couple of sentences here and there if I know what I want to say under a specific point and place the screenshots I have in their respective places in the article.
As with my note-taking process, I try to keep this phase flexible and fluid so as not to get stuck in a certain direction or rigid structure, especially if my experiment has not yet concluded.
4. Drafting time
As soon as my experiment draws to a close, I sit down and write my article. It really helps to do this while the experience is still fresh in my mind. I often find that, if I don’t get to writing as soon as possible, I’ll forget some of the fun moments or anecdotes that made the experience unique (like the time a stranger proposed marriage during a TikTok Live, for example. *cringe*).
When it comes to actually sitting down to write, my process is always the same, irrespective of what kind of article I’m working on. Because, no matter how long you’ve been at it, writing is hard! I often think of the (reported) Ernest Hemingway quote when I’m battling through writer’s block: “There is nothing to writing. All you do is sit down at a typewriter and bleed.”
Granted, that is a little dramatic for a blog post about TikTok typed out with my cute beige mechanical keyboard, but it makes me feel special.
My best work requires deep focus work to find my flow. Here are some rituals I have to make that happen:
- I try to write as early in the day as possible. I’m a morning person and find that I can focus better before lunch time.
- I block my calendar and mute notifications, so I’m not tempted to be drawn into other tasks.
- I put in my noise-canceling headphones and listen to a lo-fi or instrumental playlist on YouTube.
- I use a Pomodoro timer to help me be intentional about taking breaks when they’re actually necessary. My favorite right now is the Tide browser extension.
Within a few hours, I’ll (hopefully!) have something resembling a coherent, helpful article.
5. Proof-reading
This is probably my least favorite part of writing (for some reason, reading back what I’ve written makes me cringe). But checking my work is essential — no matter how often I check Grammarly while working, typos and weird turns of phrase always seem to creep into my work.
Something relatively new that I’ve started doing is having a tool read the article back to me. Hearing it aloud is the best way to find those sneaky typos and clumsy sentences.
My favorite tool for this right now is Speechify, which I included in my AI productivity tools list. There is a browser extension that will read the article aloud to me right in Google Docs in (and this is the best part) Gwyneth Paltrow or Snoop Dog’s voice.
Once I’ve dotted all the i’s and crossed the t’s (proverbially speaking) my process looks a lot like Tami’s — it’s time for peer edits, publishing, and distribution.
How to write a blog post in 6 steps
Taking everything we’ve shared into account, blog posts might seem daunting. But breaking the process down into manageable steps can make your process smoother and more efficient.
We’ve distilled our processes into a one-size-fits-all template you can use as a guide to writing your first blog post.
So, if you’d like to start writing blog posts or refine your process, here’s a checklist to follow:
1. Plan
Before you write, you have to plan. Without a solid plan, it’s easy to lose direction and turn a 3-day project into a 3-week one. Think of it as laying a solid foundation so you make future you’s life much easier.
- Choose a topic: I use the word “choose” loosely because post titles evolve over the course of creating an article. But it helps to have an idea of the intent of the article if you already know the title.
- Define your goal for the article: What’s the main takeaway for your reader? Is it to learn a new skill, follow a tutorial, gain inspiration? Having a clear goal can help guide the direction of your article.
- Identify your target audience: Understanding who you’re writing for is crucial for knowing how to phrase things, what examples will resonate, or their specific needs.
2. Research
Once you have your plan, it’s time to start gathering all the information you need to support your points and make your post as valuable as possible.
- Start with keyword research: Even if your aim isn’t to rank high in the search engines, keywords are still your best friend for getting your content in front of the right person. Use tools like Ahrefs or Semrush to find the best keywords for your topic.
- Gather data and insights: Look for stats, studies, and other data to back up your ideas – they help boost your credibility to your reader and search engines. Speaking of credibility, wherever possible, always add expert opinions, whether that’s yours or someone else’s.
- Organize your research: Keep all your findings in one place – I usually leave mine in the Notion page of my article. This makes it easy to refer to your findings as you write.
3. Outline
An outline is like a map for your blog post. It helps organize your thoughts and ensures your content flows logically from one point to the next.
- Set up your headings: Break your post into main sections using H2 and H3 headings. These will guide your readers through your content, so they should maintain a consistent flow. For example, in an article about “5 tips for creating great Instagram carousels”, a logical flow would be: “Start with a strong hook”, “Keep one tip or story to one slide”, and so on.
- Map out your key points: Add the main points and research you want to include under each heading. This helps you ensure you’re covering all the necessary information before diving into drafting.
4. Draft
Time to bring your article to life! Drafting is where you take all your ideas and research and turn them into a full-fledged blog post.
- Write without distractions: Use a tool like Google Docs’ fullscreen mode to focus on your writing with minimal interruption
- Follow your outline: You put a lot of work into the outline, so use it as a guide, filling out section by section.
5. Edit
Next, it’s the editing stage, or as I like to call it, the magic wand. This stage is crucial for turning what might be initially messy into a clear and polished article.
- Take breaks: If you’re only self-editing, I recommend you take a break and return with fresh eyes.
- Prioritize cutting over adding: To ensure your ideas are clearly communicated and that parts flow smoothly from one section to the next, look for places to make cuts or combine with other sections for better readability.
- Use a tool like Grammarly to catch any mistakes and refine your writing style.
6. Distribute
Writing a great blog post is only half the battle — you want to make sure it reaches the right audience. SEO is one piece of the puzzle, but there’s more to a solid distribution strategy.
Make the most of social media for repurposing your blog post – we get a lot of mileage out of one 1500-word article. Turn your writing into scripts for video, carousels for LinkedIn, and threads for X.
Take what works for you or your team
We definitely acknowledge that this process might not work for every team, so we encourage you to take what resonates and leave what doesn’t.
What similarities and differences do you notice between our process and yours/your team’s? Let us know in the comments!
Recommended Story For You :
Organize Keywords and Import CSV Files from the Google Keyword Planner
The Most Affordable And Easiest User Friendly Page Builder You Will Ever Use!

Instant WordPress Theme That Matches Your Website
Wizard to Manage Remote Backend MS Access Database Tables Fields and Indexes

If you had an aisle-by-aisle grocery list wouldn't you spend less money on impulse items?

everything you need to create a professional corporate look mini-site is there.
Unlock Your Networking Potential with GNS3Vault
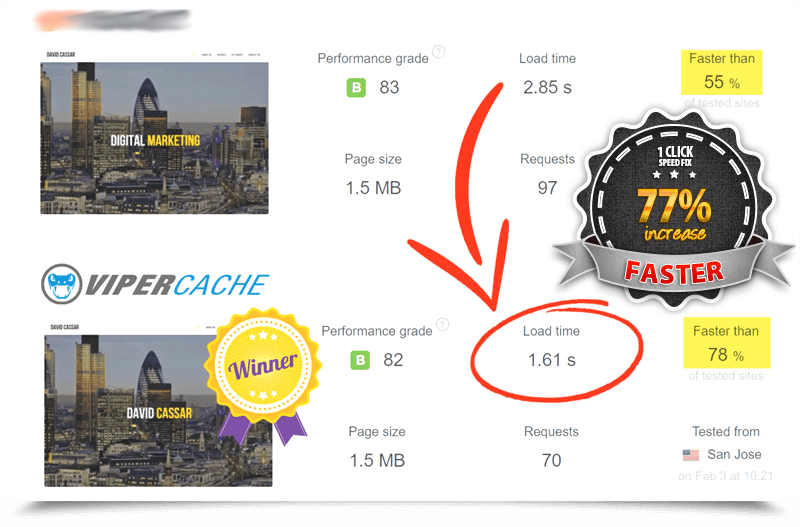
Viper Cache Was 77% Faster Than The Competetion

Understanding Stock Market Shorting eBook